Homer's Travels: Camping
Showing posts with label Camping. Show all posts

Tuesday, October 22, 2024

Great Britain 2024 - Part Three - Champing

Day Seven (cont.) - 18 September

We arrived in Rochester and taxied to our hotel the Ship and Trades in nearby Chatham.  The fifteen room hotel sits on the waterfront with views of the marina.  The rooms are above a pub with outdoor seating.  It was a very nice setting.  We spent time outside eating, drinking, and, after talking to the front desk staff about transportation options, arranging our transportation for the next couple of days - Rochester/Chatham have Uber.

The view out our window at the Ship and Trades.
Day Eight - 19 September

Rochester Cathedral.
We ordered an Uber and went to the Rochester Cathedral.  In the cathedral we were met by a docent who was half history scholar and half comedian.  He was hilarious.  (To get the idea about the caliber of his humour: He pointed at something across the room and asked "Do you know what this is?"  When we said we didn't know he said "It's my finger." - non-stop dad jokes)  We walked around the church and went down to have lunch in the crypt ... yes there was a snack bar in the cathedral crypt.

We walked from the cathedral to Rochester castle located on a hill overlooking the cathedral and city.  The castle is hollow, the wooden floors between levels long gone.  We climbed the stairs to each level until we reached the top.  We admired the view before returning down the stairs and exited through the gift shop.

We took a taxi back to the Ship and Trades where we checked out and had some drinks at the pub.  An Uber picked us up and took us to the nearby town of Cooling.  We'd expected it to be a long drive out in the country but, while it felt like it was out in the middle of nowhere, it turned out to be a fifteen minute Uber drive.  We were dropped off at the Saint James church where we would be spending the night.  In the graveyard surrounding the church there is a cluster of children's graves.  This church and these graves were one of the inspirations for Charles Dickens' "Great Expectations".

Inside the Rochester castle.
This night we would be champing - CHurch cAMPING.  There are around twenty-four retired churches no longer being used.  The churches are maintained/renovated by the Churches Conservation Trust.  They pay for the maintenance by renting them out for the night.  It is a popular cycling tour from church to church.

I expected someone to meet us but we were alone when we arrived.  There was an outhouse next to the church entrance.  We used the code from an email to open the outhouse and another code to retrieve the church key from a lockbox inside.  We put our bags in the church next to the camp cots we would sleep on, locked the door with the key (the key was big enough to be a deadly weapon), and walked the block or so to the village pub - the Horseshoe and Castle.

Saint James Church, Cooling, Kent, UK.
We made a reservation for dinner and went outside with drinks while we waited for our time.  We chatted with a local couple about traveling and champing until it was time to go inside for dinner.  The food was pretty good and the place had a nice lived in feeling.

We returned to the church and explored it.  The walls of the vestry were covered in shells, the symbol of Saint James (and on the Camino).  There was an organ but it could not be played.  We locked ourselves in and we went to bed expecting it to be cold overnight and it was chilly but we brought what we needed to keep warm (our sleeping bag liners and warm clothes).  I slept surprisingly well.

The next morning our Uber came and picked us up and dropped us at the train station.  Are you ready for some Futball?!?

Pictures can be found in my 2024-09 Great Britain Google Photos album.

Sunday, April 07, 2019

Appalachian Trail Gear: The Nemo Hornet 2P Tent (And How To Make It Freestanding)

On my first Appalachian Trail (AT) attempt I slept in the Tarptent Rainbow.  I fully intended to use it again on my second attempt.  I was putting up the tent to clean it when I pushed the pole between the pole sleeve and the reinforcing at the end.  This was a minor issue since it could have been fixed for around $20.00 but, after looking at alternatives, I decided to buy a new tent.  The Rainbow was a nice tent but it had shortcoming.

My new tent I'm using on the AT now is the Nemo Hornet 2P.  '2P' means it's a two person tent but ... Nemo exaggerates.  It is mighty tight for two people - you would have to really like your tent mate.  For one person the tent is roomy though but not quite as roomy as the Rainbow.

The tent goes up in two stages - (1) put up the tent, (2) put up the rain fly.  This is fairly standard for most tents but I have to admit I was used to the tarptent method of putting the tent and fly up simultaneously.  This allowed you to put the tent up in the rain without getting the interior wet. I'm not sure if I can put the Hornet up in the rain without some water getting inside.

Having said this, the Hornet is really easy to put up.  Deploy the tripod pole, attach the pole to the tent corners, clip the tent to the pole.  Throw the fly on and attach the fly to the corners and you are done.  In calm conditions I think I could get it up in a minute or less.

The Hornet weighs about the same as the Rainbow.  On warm days the fly can be left off to allow maximum ventilation and a clear view of the stars (a big plus in my book).  The Hornet's ventilation is much better than the Rainbow.  Lastly, the Hornet has two vestibules versus the Rainbow's single vestibule.  This allows you to easily stow gear in one vestibule, protected from the elements, and have another vestibule to enter/exit the tent.  Two vestibules also means you can open both flaps to let air flow through the tent on hot nights.

I had to make one modification to the tent.  The Hornet is considered a semi-freestanding tent.  Two of the ends of the tripod pole attach to the corners of one end of the tent using Jake's foot connections (a round ball end on the pole pops into a socket attached to the corners of the tent - easy to put together and easy to take apart).  The third leg of the tripod pole goes through a grommet on the middle of the other end of the tent.  To completely deploy the tent you have to stake out the corners of the 'grommet end' of the tent.  I prefer a fully freestanding tent so I put on my thinking cap and figured out how to make it freestanding.

A loop of cord and a cord lock through
the grommet tab of the tent.
First I examined the Rainbow.  The Rainbow is freestanding using hiking poles to keep the tent ends spread out.  I took a pole and wrapped the guy lines around the handle and tip of the pole.  I pulled the fly cords taught and saw the hiking pole ride up the tent pole - not good.  The Rainbow has a Velcro strap to hold the hiking pole in place.  I considered the issue a bit and came up with a simple cord and cord lock solution.

I ran a piece of cord through the grommet tab, fed the ends of the cord through a cord lock, and tied the ends of the cord together into a knot that would keep the cord lock from slipping off.  The loop has to be large enough to allow a hiking pole to slide through it including the joints (my poles have quick locks).

The hiking pole cinched down.
To make the tent freestanding, pitch the tent and fly as normal.  Slide a hiking pole through the added loop until the loop is roughly halfway along the pole.  Use the cord lock to cinch the hiking pole down.  At the pointy end of the hiking pole wrap the tent line around the pole a couple times.  Hook the fly loop cord over the end of the pole (See here).  At the handle end wrap the tent line around the hiking pole handle.  Make a larger loop in the fly cord by feeding the cord through the loop (See here) and loop it around the handle (See here).  Pull the fly tight.  The tent is now freestanding and can be easily lifted to move the tent to another location.

I will follow up this post once I've had some experience putting the tent up in the rain.

Sunday, April 30, 2017

Appalachian Trail: Amicalola Falls State Park To Hiawassee, Georgia In Seven Days

Note:  This is a very long post by Homer's Travels' standards.  Be warned.

The arch marking the Appalachian Trail Approach.
Day 1:  Amicalola Falls State Park to Springer Mountain Shelter - The AT Approach

The Appalachian Trail (AT) officially starts on the top of Springer Mountain in northern Georgia.  A common practice, one that I followed, is to start at Amicalola Falls State Park and hike the AT Approach trail up to the top of Springer.

I was picked up by my shuttle service and, after picking up a hiker from Switzerland at  hotel, I was dropped off at the Amicalola Falls Visitor center.  I went inside and filled out the AT registry.  I went back outside so I could weigh my backpack.  I should have gotten the clue that my pack was too heavy when it took me three attempts to lift my pack up to hook it on the scales.  It was around forty-eight pounds.

I went back inside, bought a magnet, and went out the back of the visitor's center.  A stone arch marks the start of the AT Approach.  I got my picture taken in front of the arch and headed up the trail in the light drizzle.

The first challenge of a very hard day were the stairs up to the top of the falls.  600+ stairs.  With forty-eight pounds on my back.  It took me a while to make it up to the top of the falls.  I rested at the top and took in the view.

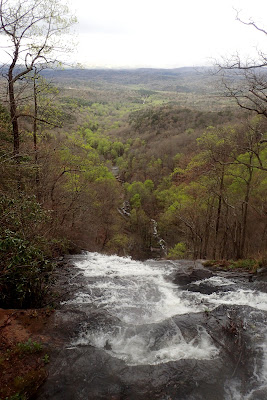
View from the top of the falls.
At the top the AT Approach becomes a dirt trail up the mountain.  I met a few people on the way up to the top.  Most passed me as I shuffled up the trail.  Others I passed.  I met Quiver, my first repeat through hiker.  He was a bit quirky with his shaved head and red mutton chops but he was nice and friendly.  I would see him nearly every day I was on the trail.

As I climbed slowly the drizzle came and went.  I was nice and dry in my Ferrino Trekker raincoat (I discovered the trick of how to put it on without it getting hung up on the backpack).  A's I climbed higher the rain turned to sleet. Nearer to the top I came upon a hiker in distress.  He was being helped by a father-son duo.  The hiker was not prepared for the cold and they had called 911.  Once I was sure everything was okay I continued up the mountain.

The father-son duo caught up with me soon after.  We walked together on and off until we reached the top.  At the top the official southern terminus of the AT is marked with a plaque.  Not far from there, on a blue blazed side trail, was Springer Mountain shelter.  It was almost full when we arrived.  I ended up getting the last space.  Other people pitched their tents and braved the cold wind.

The rest of the night was making dinner, filtering water, and chatting with the other people in the shelter.  I, and everyone else, was in our sleeping bags before 7:00pm.  It was cold that night but the shelter was facing away from the frigid wind and I was in my sleeping bag, bag liner, base layers, and light down coat.  I was nice and comfy all night ... despite the skittering of mice in the middle of the night (which is why our food was safe in the bear box).

Distance Hiked: 9.09 Miles  (14.6 km)
Elevation UP: 2,952 Feet  (899.7 m)
Elevation Down: 1,046 Feet  (318.8 m)
Average Speed: 1.5 MPH  (2.4 km/h)

Day 2: Springer Mountain Shelter to Cooper Gap

The shelter began to stir around 7:00am.  The sun was just rising and it was chilly, probably near freezing.  I got up, packed my stuff, and got ready for what was going to be a 14 mile (22.5 km) day.

The white blaze that marks the Appalachian Trail.
I headed to the AT and saw my first white blaze, the white stripe of paint on trees that mark the AT.  The first part of the day was relatively easy as you headed down Springer mountain but soon thereafter you learn that the trail went over the top of every mountain it encountered.

I met a ridge runner - a ranger who walked the trails - and I chatted with him about the trail conditions to my destination of Justus Creek campsites.  He said it would be hard until Hawk Mountain shelter but after that it would get easier, he recommended I get water before Hawk Mountain shelter, and he said there were several single campsites along the trail if I found I couldn't make my goal.

I arrived at the water source, a nice running creek.  There were several hikers here filling their water bottle and filtering.  I filled up my water and ate a snack.  It was probably here that I realized that I wasn't eating as much as I should but the lack of appetite made eating a chore.  I should have been more diligent at forcing myself to eat.  People kept saying my appetite would return around day five or six.  It didn't return until I got to town.

After Hawk Mountain shelter the trail was up and down over and over again.  It didn't feel any easier.  I finally gave in to my exhaustion when I arrived at Cooper Gap.  There were a three hikers there already.  One was a hippy type who was singing to himself.  The other two were a pastor and his teenage son (along with their little dog Duke).  I found a somewhat level spot, set up my tent for the first time on the AT, and ate dinner.

After eating I wondered about hanging my food.  I walked over to the pastor and son and asked it they were planning to hang their bags.  We decided it was probably the proper thing to do.  I pulled out the cord I'd carefully coiled before leaving home.  The cord was one huge gordian knot.  After wrestling with it I managed to get enough line loose to hang the bag.  It was ugly with a messy knot in the middle but it worked and my food bag was soon swinging from a tree branch.

I ended up in my tent around 8:00pm and slept well most of the night.

Distance Hiked: 11.82 Miles  (19 km)
Elevation UP: 1,944.5 Feet  (592.6 m)
Elevation Down: 2,533.7 Feet  (772.2 m)
Average Speed: 1.4 MPH  (2.2 km/h)

Day 3: Cooper Gap to Lance Creek campsite

I got up with the sun again, broke camp and headed up the next mountain.  First stop of the day was Justus Creek where I filled up my water bottles.

Up and down the mountains I went.  Near the top of one a large rock outcropping invited people to rest and enjoy the views.  I did just that along with eating lunch - Tyson chicken, olive oil, and a tortilla - one of my better meals actually.  The Pastor, his son, and Duke showed up soon after and we finally exchanged names (I knew Duke's name before the Pastor's or his son's).  We chatted a little and ended up walking together on and off the rest of the day.  They walked a little faster than I did but I usually caught up with them when they were resting.

The weather was beautiful and the views went on forever.
I arrived at my destination, Lance Creek, and Pastor and son were waiting for me.  The campground was full but there was an old road that provided several more spots to set up our camps.  I put up my tent, filtered some water, and ate some chicken and noodles.  I was too tired to socialize much.  I tried but I was just too pooped.  I went to hang my food and tried to wrestle with the damn knot but gave up again.  I ended up cutting the knot out and tying the two longest pieces together.  I know this wasn't the best way to do this but I was too tired to fight this knot and frustration led me to my crazy solution.  I crawled into my tent and went to sleep.

Distance Hiked: 13.35 Miles  (21.4 km)
Elevation UP: 2,952 Feet  (719.4 m)
Elevation Down: 2,313.1 Feet  (705 m)
Average Speed: 1.4 MPH  (2.2 km/h)

Day 4: Lance Creek campsite to Neels Gap (Mountain Crossings)

I woke up early.  I got out of my tent just after 6:00am.  It was still dark.  I noticed a few bright stars through the heavy canopy of trees.  That is one thing I wish I'd done, I never took the time to stay up and look at the stars.  I was always too tired to stay up.

I left Lance Creek around 7:00am and, once again, headed up the next mountain.  Today I would climb the tallest mountain on the Georgia section of the AT - Blood Mountain.  It took me a long time with many stops on the way up.  Every large rock, log, or stump seemed to dare me to sit on them and I almost always took the dare.

On the way up I met Journey who was walking with her son's dog Tundra.  The dog was too undisciplined for this hike.  It kept stopping to smell things and really slowed Journey down.  On top of that she was carrying water, food, and CLOTHING for the dog.  There were quite a few people hiking with their dogs.  The more well behaved dogs did add companionship and they also scared off bears.

I made it to the top where the stone Blood Mountain shelter stood.  I took some pictures and sat on a rock to eat lunch.  The Pastor, son, and Duke showed up soon after.

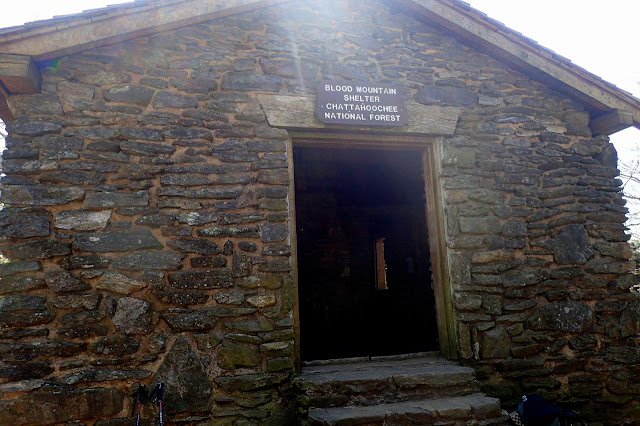
Most shelters are made of wood.  This was my first stone shelter.
I got a bit lost leaving the shelter.  It took a couple tries to find the white blaze.  Journey and I headed down the rocky trail.  We were following some day hikers who, unfortunately, took a wrong turn.  This resulted in Journey and I heading down a very steep rock face before realizing we were going the wrong way.  We turned around and climbed carefully back up the steep rock until we got back to the marked trail.  This did nothing for my energy level.

Going down Blood Mountain was not fun.  You were constantly stepping down from rock to rock over roots and other things that did a number on the ol' knees.  It didn't help when Tundra broke loose and scared a little girl to death.  He almost made Journey fall off a rock and I scrambled to grab his leash.

I spent the rest of the time mumbling to myself swearing at the rocks and roots.  I was totally done.  When I finally reached Neels Gap I saw the Pastor sitting with his son and his family (who had met him there) and I said "I. Am. Done!!!"

There is a large tree outside Mountain Crossings full of shoes hanging from its branches.  These are the shoes of hikers who couldn't make it past day four.  I was tempted to toss my shoes up there.

The pastor helped talk myself down from the ledge.  I decided I would try to lighten my pack and I would take a zero day at the Mountain Crossings hostel.  I checked into the hostel (along with a couple sick hikers, including Quiver).  I hauled my pack into the Mountain Crossings store and asked for a pack shakedown.  The guy went through all my stuff.  He was very impressed with the equipment I was carrying.  He said it was what he would have picked.  He suggested I stop in Hiawassee to resupply so I didn't need to carry so much food.  He pointed out several things that I really didn't need.  He handed me a box to fill.

I decided to go through my food and stuff the next day when I was rested and had time to think.

Note: The Pastor had hurt his knee that day and headed home to rest it.  He never returned.  He was only a section hiker and he wasn't far from his home.

Distance Hiked: 8.36 Miles  (13.4 km)
Elevation UP: 1,725.2 Feet  (525.8 m)
Elevation Down: 1,733.7 Feet  (528.4 m)
Average Speed: 1.0 MPH  (1.6 km/h)

Day 5: Neels Gap to campsite just past Hogback Gap

I woke up at 8:00am when the Mountain Crossings guy came in and told everyone to be out by 9:00am.  I asked about doing a zero day and he said they didn't do zero days here.  CRAP.  This was my fault since I didn't ask.  I could have walked to some cabins just down the road and spend a zero there but I decided not to.  This may or may not have been a mistake.

I scrambled and went through my gear throwing stuff into the box.  I put some food into the hiker box and threw other food into the trash.  I took the box to the store and shipped it home - it was almost 6 lbs (2.7 kg).  With the reduced food I think I was around 10 lbs (4.5 kg) lighter than when I started back on day one.  I headed out ... up the mountain. It was nearly 9:00am, my latest start.

Despite it being lighter my backpack still felt heavy and my legs continued to complain all day.  I caught up with a couple of guys I'd briefly met at Lance Creek (They thought they'd met me before but were mistaken).  They were Gargoyle and One Step At A Time (or Blue Bunny - he carried his child's blue bunny)  We ended up walking together most of the day.

Our goal for the day was Low Gap shelter but I could tell I wasn't going to make it.  My legs just weren't in it today.  We reached Hogback Gap and refilled our water.  In the parking lot a guy was giving out trail magic - water in this case.  I'd seen the same guy at Neels Gap with a cooler full of beer.  This was my first trail magic.

We headed up the next hill and I told Gargoyle and Blue Bunny that I was near my limit and I would be stopping soon.  There were campsites along the trail, usually at the high and low points.  Since I was heading uphill I knew there would be a campsite soon enough.  I skipped the first one I passed.  I still hoped to keep going.  The second campsite I passed was the one for me.  I put up camp and took a nap in my tent for an hour or so before getting back up to eat dinner.  It would be another early night for me.

I decided I was going to get off the trail in a couple days.

Distance Hiked: 8.17 Miles  (13.1 km)
Elevation UP: 2,121.2 Feet  (646.5 m)
Elevation Down: 1777 Feet  (541.6 m)
Average Speed: 1.1 MPH  (1.7 km/h)

Day 6: Campsite just past Hogback Gap to Blue Mountain Shelter

I got up at 7:00am and headed out up the mountain.  I arrived at Low Gap shelter a bit later where I found Gargoyle and Blue Bunny.  They hadn't made it much farther than I had having camped at the top of the mountain a mile or so past where I'd stopped.  I used the shelter facilities and refilled my water bottles.

I left with Gargoyle and Blue Bunny.  I decided to stay with them the rest of the day.  They had a good pace for me.  Not too fast and with enough breaks on the uphill portions.

We stopped at a creek with multiple cascades.  We filled up our water bottles and ate lunch.  As I ate and rested a lady from Texas showed up.  She was Lucky Star.   I once again didn't eat enough.

The next stop of the day was another stream near the end of the day.  We knew there wasn't any water at the shelter so we refilled our bottles again.  Filling water bottles and filtering water is a multiple times per day thing on the AT.

Near the top of Blue Mountain we arrived at Blue Mountain shelter.  There were three hiker there who were giving away food and supplies because they were quitting early.  One of their group was hurt and they needed to get off the trail.  I took a granola bar.

Lucky Star showed up along with several other hikers.  A French hiker was at the shelter and, strangely enough, was taking a couple zero days at the shelter to rest a ligament issue.  Not sure why he didn't go into Hiawassee for the zero days.

A hiker showed up with his dog Bear and a tub full of beer.  He said that he'd heard that there wasn't very much trail magic lately so he hiked up the mountain with the beer to share with AT hikers.  They lit a fire in the fire pit (the first fire on my AT) and everyone relaxed and told stories.  I hung back.  I was too tired and I ... I wasn't there.  I was physically on the trail but my heart wasn't.

I called the Budget Inn in Hiawassee and made a reservation before I crawled into my sleeping bag.

Distance Hiked: 11.54 Miles  (18.5 km)
Elevation UP: 2,017.6 Feet  (614.9 m)
Elevation Down: 1,569 Feet  (478.2 m)
Average Speed: 1.4 MPH  (2.2 km/h)

Day 7: Blue Mountain Shelter to Unicoi Gap (Hiawassee, GA)

I got up at 7:00am, packed up, and admired the beautiful sunrise.  It would be my last on the AT.  I said my goodbyes and headed down Blue Mountain.

I think I made it down in record time.  It felt a lot easier than all the other days.  I know it was an illusion because it was all downhill and I knew it would be over soon.

I reached the parking lot, took off my pack and waited for the Budget Inn shuttle.  As I waited Gargoyle and Blue Bunny showed up.  They were happy to see me because, on the downhill, they decided to take a zero day in Hiawassee and, since I was still there, they hadn't missed the 9:00am shuttle.

The shuttle picked us up and driver Bob told us about Hiawassee during the 10 mile drive into town.  I checked in, took a warm shower, and headed over to the Subway next door for lunch.  The Dairy Queen was hit around 3:00pm.  It seems once I got into town my appetite had come back full force.

The rest of the afternoon was spent making airplane and hotel reservations and finding a shuttle to get me down to Atlanta from Hiawassee.

I started some laundry and, meeting up with Gargoyle, Blue Bunny, Lucky Star, and Becca, headed "downtown" in search of Daniel's Steakhouse home of the all you could eat buffet.  We found the place and loaded up with everything they had.  Since I was leaving the AT I footed the bill for all five of us (a whopping $54 plus tip - dirt cheap).  It was sad my Trail Family began to form on the day I left.

I ended up giving and selling some stuff to Gargoyle and Blue Bunny.  I said my good nights and byes before going to bed.

And that was the end of my Appalachian Trail adventure.

Distance Hiked: 2.18 Miles  (3.5 km)
Elevation UP: 161.7 Feet  (49.2 m)
Elevation Down: 1,093.7 Feet  (333.3 m)
Average Speed: 2 MPH  (3.2 km/h)


Map of my AT from Amicalola Falls state park to Unicoi Gap.
I didn't take that many pictures and, in fact, took only one picture on days five and six (and it was bad).  I think I was already checking out.  The best pictures I took can be found in my 2017-04 Appalachian Trail Google Photos album.

Thursday, April 06, 2017

Appalachian Trail: The Adventure Begins

I am writing this post before I actually start the Appalachian Trail (AT).  So everything I write here is subject to change.

If everything went right, Mama's Taxi picked me up from my hotel and dropped me and my pack at the Amicalola Falls state park visitor's center.  There I signed the AT log, weighed my pack, and hopefully gotten my picture taken at the stone archway leading to the Springer Mountain approach trail.  By the time you read this I should be at the Springer Mountain shelter - the official start of the AT.

I will be highlighting the date field on my AT stages (see the Appalachian Trail Tab above under the header picture) indicating where I have hiked and where I will be hiking for the each stage ... assuming I have internet access at my rest stops.  I will also update changes to my plan including changes to stops and dates, if any.

This is the last of the mini-blast of posts this week.  My next update should be in four days when I get to Neel Gap.  I'm hoping the Mountain Crossings' hostel has WiFi/internet.  If it doesn't, my next update won't be until the 16th of April when I get to Franklin, NC and I take my first break.

And away I go ...

Saturday, April 01, 2017

Appalachian Trail: And The Packing Begins

I have always been a late packer.  When we go on our long vacations I always pack the night before.  So far I have never forgotten anything that I needed.

Packing for the Appalachian Trail (AT) is a bit more complicated.  Friday afternoon I brought everything together and laid it all out on the basement floor.

That is a lot of stuff to get into one bag!
What you see in the picture above is enough stuff for seven days.  This includes two pairs of pants (I will be wearing one), three shirts, three pairs of socks, toe socks, and underwear, winter and rain gear (I described this gear here), toiletry kit, first aid kit. tent, sleeping bag (and bag liner), stove and cooking pot, and roughly two pounds of food for each day on the trail.  Also included will be my tablet, an external battery pack (to charge the table and cell phone), a camera, a GPS, and all the batteries, chargers, and cables that go with these.  Water will be carried in soft-sided platypus bottles.

Everything packed away in my backpack.
As you can see it at left, it all fits in the bag ... almost.  The blue bag on the top of the pack is the second food bag I had to buy.  I mentioned before that it would be a tight fit to get all my food in one bag and, in fact, it was too tight a fit and a second bag was necessary.  Both food bags will fit in the pack but it would be too full to seal properly so one food bag will be strapped on top.

After I packed the backpack, I weighed it.  As usual, the pack was heavier than I expected.  I expected forty-two or forty-three pounds but ended up closer to 48 pounds (21.8 kg).

It seems to be a lot but, when I think about how I can whittle it down I can only come up with less than a pound of excess.  The tablet (and external battery) is probably the heaviest "luxury" item I have.  I will probably leave the sandals at home along with a few small things.  My weight will go down once I can ship my winter gear home which may be fairly early this year.

The weight of the pack will also go down as I eat my way through the food bags.  If I eat everything, the pack weight will shrink by just over two pounds (1 kg) per day.

It will be interesting to see if I eat it all.  On my first Camino I didn't eat nearly as much as I should have and lost weight over time.  I was just not very hungry when I was walking or when I was tired at the end of the day.  I ate better on my second Camino but still lost a few pounds.  Whatever happens I suspect I will be adjusting the amount of food I will be eating as I go.

Thursday, November 10, 2016

Camp #12: Letting Off Steam At Indian Cave

As I mentioned in my last post, I was planning to go camping to celebrate the election.  I almost didn't do it after seeing the results of the election but, after encouragement from a few friends and the Wife, I changed my mind and went to Indian Cave State Park for the last camp of 2016.

Of the three places that have backcountry camping in my area, Indian Cave is the most remote both from my home and from civilization.  Civilization around the park consists of small towns of less than two hundred people.  This meant a nice and quiet night for camping.  Owls and coyotes were the only sound I heard.

A few remaining fall colors at Indian Cave.
I arrived about an hour before sunset and, starting at trailhead 10, hiked up East Ridge trail to the first campsite.  Hike is a strong word since it was only a half mile (805 m) but it was a climb - sometimes steep - up 480 feet (146 m).  At the top of the ridge is a campsite I'd passed several times during my hikes here.

The campsite has changed quite a bit over the years.  The first time I passed it there was an adirondack shelter, a fire ring, and a bench that faced the setting sun.  The bench is now gone (it had been pulled out of the ground by vandals a few years ago) and the shelter apparently had been vandalised and no longer provided safe shelter.  The fire ring was still intact though and I set up my tent where the bench once stood.

The hills and trees of Indian Cave.
From the campsite the views are majestic.  To the west is a large expanse of forest.  Some of the late fall colors remained.  To the north-west there are views of the Missouri River.  The skies were clear blue and everything was tinged with the orange of the setting sun.

The Missouri River.
I collected firewood and built a fire just as the sun was dropping under the horizon.  I sat on the edge of the shelter and boiled water for my evening meal: Beef Stroganoff.  For dessert I had a bag of homemade trail mix.  The first star made it's appearance.  It was actually Venus but I wasn't picky ... I made a wish on it anyway.  It was joined by the Moon.  The Moon would be blotting out some of the stars tonight but I didn't mind too much.  The Moon is on its way to becoming a supermoon on Monday - the largest since 1948.  It won't be this large again until 2034.

The last of the day's light, my tent, and the first star of the night.
Then I let off steam.  I asked the Moon "What the heck is going on?"  I pleaded with the stars to tell me what I should do.  Yes, I did this out loud - I do talk to myself often.  I ranted and raved about how crappy 2016 was turning out to be and the Universe didn't care.  But I did feel better after talking my way through a few things.  That was why I'd gone camping.

Despite the bright moon, there were still stars to witness my rantings.
The fire burned quicker than I expected and I was out of wood and fire by 7:30pm but all this soul searching wore me out so I climbed into my tent and fell asleep.  It was a cold night with temperatures near 37°F (2.8°C).  I was in my long underwear bottoms, long sleeve t-shirt, socks, balaclava, stocking cap, sleeping bag liner, and sleeping bag.  Around 3:00am I woke up and I was cold so I put on my fleece jacket and snuggled deeper into my sleeping bag.  The fleece did the trick and I was able to fight off the chill the rest of the night.

I woke up around 5:00am to the sound of wind.  Lots of wind.  I spent the next hour dozing in and out and thinking how I would stow the tent in such a high wind.  I packed my backpack and crawled out of the tent.  As soon as my weight was out of the tent it took off.  I grabbed it before it could fly off the ridge and ran for the groundsheet that took off as well.  I stuffed the groundsheet under my pack to hold it in place while I walked around the remains of the shelter to find a place out of the wind.  I managed to find such a spot and I stuffed the tent back into its bag.

The Sun's first light over the path forward ... but I went the other way back to the car.
I poured the remainder of my water on the still hot coals of the fire and headed down the trail back to the car.  After a stop at McDonalds for my customary hot cakes and large OJ, I headed home back to the real world.  I think the camp probably did me some good.

This will probably be the last camp for the year and probably the last until I start the Appalachian Trail.  This may change if we have weird warm weather this winter but I'm not expecting that to happen.

Pictures were added to the end of my 2014-2016 Camping in Iowa and Nebraska Google Photos album.

Friday, October 28, 2016

Camp #11: Preparation Canyon Sunset And Sunrise

My eleventh camp was in Preparation Canyon.  I've camped here two times before and I've always liked how remote it feels.

Preparation Canyon Sunset.
The park is a fairly small park but is is surrounded by farmland and the nearests towns, Moorhead and Pisgah, Iowa, are small.  The area is rural.  It is also Trump country based on the number of political signs I saw going to and from the park.  I was hoping it would be a quiet night but I forgot it is harvest season and the distant sounds of combines harvesting corn could be heard all night (I think I still heard them when I woke up at 2:30am though I might have dreamt it).

The campsite looks small when seen from a nearby trail.
Like the other campsites I have used in this park, there was no real level ground to pitch the tent on.  This meant I would wake up to one side of the tent in the morning.  I found the best spot I could up hill from the picnic table, opposite the fire ring, and put up the tent.

I like fall camping.  The temperatures are crisp, the skies are often clear, and the stars go on forever.  This fall camp was a bit odd.  First of all the temperatures were above 70°F (21°C).  Secondly the low temperature for the night was 56°F (13°C) which is much milder than I expected for this time of year.  Lastly there was a whisp of high altitude clouds that obscured, but did not totally block, the stars.

A nice fire to contemplate life beside.
I lit my fire before the sun went down.  The wood that I collected was very dry and the fire burned hot and quick.  I had to collect more wood over the next hour to keep it going.  I sat at the picnic table and ate my Spaghetti with Meat Sauce while watching the sun set and the fire burn.  On my other camping trips I usually do a lot of reading by the fire.  This one I just sat by the fire, looking into the flames, and letting my thoughts wander.

A leaf covered trail brings back memories of youth.
Once the sun had completely fallen below the horizon I layed down on the picnic table bench and looked up at the stars.  I'd hoped to see a lot tonight as the forecast was for clear skies but the wispy clouds blocked some of the view and dimmed many of the stars.  Nevertheless the stars still shined and I saw a lot more than I can from the deck of our house.

I got in the tent early (8:00pm) and read a little of my ebook before falling asleep,  I slept surprisingly well and only woke up a few times during the night.  I got up just after 7:00am, before the sun came up over the horizon, broke camp, and poured the remainder of my water on the cold ashes of my fire.

I returned to the car walking on a leaf covered trail.  There is something about the sound of fall leaves crunching and shooshing under my feet that makes me feel content.  Maybe it's a memory of jumping in piles of leaves when I was a kid.

I drove home making only one stop along the way - my customary McDonald's hotcakes and large orange juice that I always have after camping.  It was a good camp and, weather permitting, I will have one more in November. (Pictures have been added to the end of my 2014-2016 Camping in Iowa and Nebraska Google Photos album.)

After every sunset there will be a sunrise.

Thursday, October 20, 2016

My New Bag

I purchased another backpack (my fourth [!] since 2010).  After my Rocky Mountain National Park (RMNP) camping trip I decided that a lighter backpack would be better for the Appalachian Trail (AT).  The one I chose was the Hyperlite 3400 Southwest in black (The black pack has a thicker material for added strength and the other color, white, gets dirty too easily).

The Southwest is a simple pack.  It is essentially a dry sack with arm straps.  Coming in at 2.1 lbs (0.95  kg) the pack is 2.7 lbs (1.2 kg)  lighter than the Osprey pack I used on the RMNP camping trip.  The pack has a large, deep, main compartment, three external pockets, and two belt pockets.  The main compartment closes like a standard dry sack, i.e. roll it over a few times then click the ends together.  A 'Y' strap helps compress the bag vertically as well as allows you to secure equipment on the top of the pack.  There are multiple attachment points for equipment mounting.

The Southwest is a 55 liter pack rated for 40 lbs (18 kg) though, after exchanging a few emails with hyperlite, you may be able to push it up to 50 lbs (22.6 kg).  I think forty pounds will be plenty but for some of the longer AT stages the food will probably push the weight up to the low to mid forties.

The pack is made of dyneema, a very durable and waterproof material.  The dry sack construction of the pack means it shouldn't need a pack cover for rainy days (assuming you pack waterproof stuff in the outer pockets).

The pack has a hydration sleeve inside the pack.  My Osprey had an external hydration sleeve that I found incredibly convenient.  The exit for the hydration tube is on the right.  This is odd since most packs give you the option of feeding it either right or left.  This is no big deal but I am used to the drinking tube being on my left.

The simplicity of the bag is a payoff for lack of amenities.  Along with the internal versus external hydration sleeve, there are other things missing.  For example, my Osprey pack has a bottom zipper that allows for easy access to the bottom of the main compartment.  It also has a 'J' zipper that allows you to open the main compartment for easy access to everything.  The Southwest main compartment access is only from the top which means you have to dig to get stuff on the bottom of the main compartment.  You want the bells and whistles?  Then you have to carry the extra weight.  If I'm hiking 2,200 miles I'm willing to trade convenience for less weight to carry.

I used the Southwest on my September camp and it performed well (keep in mind I had a relatively light load).  The pack does not have load lifters.  Load lifters are adjustable straps on the top of the arm straps that allow you to snug the load to your back.  The idea is, when walking on level ground or climbing up, the load should be close to your body.  When you are going down you loosen the load lifters allowing the load to flop back a little thus helping you keep your balance.  My Osprey had load lifters and, during my RMNP hike, I never adjusted the load lifters and I was moving up and down a lot on that hike.  I didn't notice much of a difference so I am not concerned about the lack of load lifters on the Southwest.

All in all I am happy with the pack so far but it is early.  I will be taking it out for a second overnight camping trip next week and I will have another chance to feel out my new AT pack.

Friday, October 14, 2016

A Tent Comparison: The Tarptent Notch Versus The Tarptent Rainbow

NOTE:  I was going to write this post over a week ago but lately life has been distracting.

Over the last few years I have looked for a tent to take on the Appalachian Trail (AT).  I have tried two tents and I think I have the one I will take.  Here are the tents that I tried:

The Tarptent Notch.
The Notch

A few years back (Christmas 2013) I purchased the Tarptent Notch.  I used this tent for eight overnight camps, seven days during RAGBRAI, and for my five day camp at Rocky Mountain National Park (RMNP).  The tent did a great job.  I fully expected that this would be the tent that I would use on the AT.

The Notch is a small one man tent (the tent weighs 27 oz [0.77 kg]) that pitches using trekking poles.  The tent and attached fly has two entrances, and two vestibules, that allow easy access to the interior and, with both doors open, allows ample ventilation.  I usually used one entrance and stored my backpack and gear in the vestibule of the other entrance.  This meant I had a clear path in and out the tent.

The Notch pitches easily taking only a couple of minutes assuming no hard wind.  The tent is pitched using two trekking poles and four tent stakes.  The tent can not be pitched freestanding, i.e. tent stakes are required.  I did pitch it once on a wooden platform but I used screw in cup hooks instead of stakes.  Pitching it on a rock surface would be difficult at best and, more likely, impossible.

The interior of the Notch is fairly cozy but I could easily sit up in the middle of the tent.  The bathtub floor provides protection from running surface water.  The tent seams are not sealed at the factory.  I sealed the seams using a silicone- mineral spirit mixture.  This resulted in me staying dry the few times that it rained during my camping trips.  There was one time when some rain came in through vents at the peak of the tent but I think this was a fluke - I hadn't pitched the tent on a level surface.

During my last camp at RMNP I noticed small holes had developed in the interior tent screen.  This could allow small insects to get into the interior of the tent.

The Tarptent Rainbow.
The Rainbow

As I considered my tenting needs for the AT I realized that I would need a tent that was capable of being pitched free standing (i.e. without tent stakes).  Also, the small holes in the Notch's screen showed that the tent had suffered some minor wear and tear.  My choice for a replacement was the Tarptent Rainbow.

The Rainbow is also a one man tent.  It weighs more than the Notch coming in at 36 oz (1.02 kg).  The tent has a bathtub floor and only one entrance and vestibule.  The vestibule is a bit tight but, having said this, the interior tent is much larger that the Notch and you could easily store your gear in the tent and still have enough floor space to sleep.  You could probably fit two people in the tent (without gear).  It would be a snug fit so you would have to be fond of your tent mate.

The Rainbow pitches using a long, collapsable pole and a minimum of four tent stakes (six tent stakes work better though).  The pole adds some weight so I purchased the carbon fiber pole to keep this weight to a minimum.  The four main stakes (two at each end) can be replaced with trekking poles.  When trekking poles are used the tent becomes freestanding.  This allows you to pitch the tent onto any solid flat surface.

The Rainbow does not pitch as fast as the Notch.  The main pole, 146 inches (3.7 m) long, is threaded through a sleeve that runs the length of the tent.  Threading the pole through the sleeve is not hard but you have to push the pole through.  Pulling the pole does not work since it is divided into nine sections connected together by bungee cord.  Pulling the pole simply makes the sections pull apart and before you know it you are only stretching bungee.

My AT Pick

Both tents have pros and cons.  The Notch is lighter, has better ventilation, and packs smaller.  The notch is roomier and can be pitched free standing.  I think, in the case of my upcoming hike up the AT, the ability to be pitched freestanding trumps the Notch's pros.

Thursday, September 29, 2016

Camp #10 - The Third Return To Hitchcock Nature Center

It's been over a year since the last time I went camping.  The last time would have been August 2015 when I did a five day camp in Rocky Mountain National Park.  I decided to end the camping drought last night so I could test out a couple pieces of new equipment, namely my new tent and backpack.

Late afternoon sunlight reflecting off the pond near my campsite.
I've camped in Hitchcock Nature Center three times before.  Each time I picked different campsite from the six or so that are available.  These three had all been at the top of ridges.  This camp I picked one at the bottom of Fox Run Ridge next to a sizable pond.

A panorama of the pond from the campsite fire pit area.
The day was perfect for camping.  Temperatures were in the high 60s (about 20ºC) with a light breeze (probably because I was at the bottom of a valley - it was breezier at the top of the ridge).  The skies were mostly clear with just a wispy cloud here and there.  There was only a 10% chance of rain so I expected to remain dry.

The campsite is only a mile (1.6 km) from the trailhead and this is mostly downhill so it was an easy hike.  The tent pad (a sandy log framed area) was on the trail and the fire pit was a short distance away on a piece of land jutting out into the pond.  I took a look around the area before putting up my new Tarptent Rainbow tent.  [I will be posting about my new tent soon.]

One of my escorts as I walked along the edge of the pond.
I walked along one edge of the pond.  As I walked I was escorted by the sound of frogs jumping into the water from the pond's edge (there really wasn't a beach  ... just a sharp drop off with enough space for a frog to sun itself).Across the pond I could see a canoe.  It appeared to be on private property just outside the Nature Center's land.  The pond was good sized and had plenty of room for some canoeing.  The water's surface was smooth with only the wakes of small water insects to ripple the surface.

Water insects imitating small motor boats.
I sat by the fire ring and made my dinner.  I tried a new dehydrated meal by Good to Go.  I tried their Classic Marinara with Penne.  When I open the packet it instantly smelled wonderful.  The ingredients were all "real" food with no added chemicals,  The salt was 40% lower than the Mountain House meals which is a plus though it still had 15% of your daily salt requirement per serving.   The pouch had two servings but ... no one eats a half of a pouch so it was 30% of you daily salt requirements.  Yes, the Mountain House meals have close to 50% of the daily requirement per pouch (two servings).  Yeesh!

How was the penne?  The Good to Go meal had the same issue that the Mountain House Mac n Cheese had, namely the pasta was almost crunchy.  It is possible that I'm not heating the water enough but the water was boiling when I poured it into the bag to rehydrate the meal.  The flavor was good at the beginning but it strangely lost flavor as I got down to the bottom of the pouch.  The red pepper flakes gave the meal some heat which I'm not that fond of but it didn't hurt it that bad.  The heat might have been an attempt to pump up the flavor but it didn't quite succeed.

Some early autumn color.
The rest of the night was spent lighting a fire (flint, steel and  a Vaseline soaked cotton ball) and reading an ebook as the sun went down and the temperature dropped.  The fire kept me warm and I had enough layers to be comfortable.  As the fire dwindled, and I got a bit tired, a headed for the tent, stopping to look up at the stars.  The 10% chance of rain manifested itself as thin wispy clouds that didn't do too much damage to my star gazing.

I got in my tent and read some more until the two benadryl kicked in and I went to sleep.  The train tracks pass close to the park but the sound of the train and accompanying whistle didn't bother me as much as it did my other camping trip I wrote about here.  I fell asleep listening to the hooting of owls and the howling of coyotes.

It got down to around 45ºF (7ºC) overnight but I stayed nice and warm in my sleeping bag.  I woke up early in the morning to a screech which sounded like a cat in heat but I suspect it was a raccoon or opossum being threatened somewhere.  I rolled over and slept some more, getting up at 7:00am.

I packed up my backpack and tent.  I needed gloves.  My fingers were numb as I stuffed the tent in its bag.  The hike back to the car was quick.  Another successful camping trip under my belt.

I hope to camp again in October and, weather permitting, in November.

Pictures can be found in my 2014-2016 Camping in Iowa and Nebraska Google Photos album (scroll down to the bottom).

Oh yeah.  I found a new camping friend.

My new camping friend.

Sunday, August 23, 2015

Camping RMNP: Lessons Learned

Every now and then it's ok to have a bad experience if you can learn from it.  My Rocky Mountain National Park (RMNP) five day camping trip was a mix of good and bad.  From the good I got wonder, joy, and happiness.  From the bad I learned valuable lessons that will help me improve.

There were five major lessons learned on this camp.  Four are universal and can be applied to most, if not all, future camping.  The other is a bit more specific.  We'll start with this one.

Lesson One: Altitude is a butt kicker.

Doing my first five day camp in a park with altitudes ranging from 8,000 ft to over 12,000 ft probably wasn't the smart thing to do, especially considering that I live at 1,000 ft 99.9% of the time.  Altitude sickness comes in various grades and severities.  I am fortunate to handle altitude pretty well.  In Peru, on our first day at altitude in Cuzco, I suffered from a headache which went away after a good night's sleep.  In RMNP I didn't even have a headache.  What I did suffer from, both in Peru and RMNP, is rapid onset fatigue ... i.e. I tired very easily.  This made my days two to three times harder than they should have.

I'd spent the night in Estes Park (altitude 7,000 ft) and I'd hoped it would have acclimatized me but one night was not enough. It took until day three on the trail to finally start to acclimatize.
Learned: Take time to acclimatize before you do physical activity at altitude.  You may need up to a week to fully acclimatize.  In the meanwhile, take things slowly and rest often. 

Lesson Two: Thirty-seven pounds is not light.

I thought my pack was light at thirty-seven pounds but once you hoist that pack on your back it begins to feel like a ton of bricks.  When I chose my latest pack, I picked it for it's weight capacity (50+ lbs).  I figured I may have to go over forty pounds occasionally and most ultralight pack capacities top out at 40 pounds.  Now I know better.  Thirty-seven pounds is too much.

My current pack weights, empty, about 4.8 lbs (2.15 kg).  Another pack I was looking at but rejected due to it's lower weight capacity comes in at 1.8 lbs (0.84 kg).  Both of these packs have the same volume (60 liters).  One weighs three pounds lighter.  Now I know I could have gone with the lighter pack and I would have shaved a few pounds off my load.

Besides the pack, I will have to look at all my equipment to see if I can shave a few ounces (or pounds) off the final weight.  I am starting to understand the ultralight hiking obsession that I've read about.
Learned:  Keep the weight to a minimum.  Lighter is often better and a light pack means additional spring in the hiker's steps.  Lighter = happier.
Lesson Three: Food is not food unless it has calories.

I thought I'd brought enough food with enough protein and calories to sustain me for five days.  Turns out, for various reasons, I was wrong.  In addition to the weakness caused by the altitude and weight of the pack, I wasn't giving my body enough fuel.

I carried four dehydrated meals, trail mix, and jerky.  I also carried some sandwiches packaged for campers in case it rained and couldn't use my stove.  First off, I didn't carry enough of each.  I probably needed double the calories ... maybe even triple.  Another thing is everything has a high sodium content which made me drink a lot of water.  This is not a bad thing but high sodium is not ideal.

To make things worse on this trip, all my jerky molded on the first day and had to be tossed out.  I never noticed this at home because I store my jerky in the fridge ... hence no mold.  The camping sandwiches saved the day here substituting for the jerky.

Before my next long camping trip I will have to research calorie dense food - foods that really pack the calories into each ounce.  I will also have to investigate foods that can take the heat and not spoil too quickly.
Learned:  Calorie dense food that doesn't spoil.  The more you expend energy, the more calories you need to keep going.
Lesson Four: Pull up your pants!

The North Face convertible pants that I love do not fit me properly.  Also their integrated belt (i.e. the belt is sewn into the waist) will not stay cinched tight.  This allows the pants to shift down and the pack belt then rubs on the hips without the protection of the pants.  I didn't have open wounds but it was a bit bruised and sore on my hips.
Learned:  Find better fitting hiking pants, preferably without an integrated belt.
Lesson Five: Toesocks RULE!

When I first bought my Injinji toesocks I said that they would need a multi-day hike to really test them out.  Well, on my camp I thoroughly tested them.

I had three pairs of liner toesocks and three pair of wool hiking socks.  While I hiked I wore a pair of liner socks with a wool hiking sock over them.  I wore two pairs for two consecutive days each and one pair for the last day.  I climbed up, I climbed down, and I walked on all sorts of surfaces with these socks on.  I wore a pair of Solomon Eskape Aero hiking shoes with custom orthotic insoles.

The results, frankly, were amazing.  During the entire trip, I had only one blister on one toe.  This was better than I expected.  I had a couple hot spots on a big toe and the bottom of one foot but they only lasted a day and never developed into blisters.  I couldn't have asked for better results.

In addition to having minimal blister issues, the soft corn on my toe that seems to always flare up when I do long hikes, never bothers me when I wear the toesocks and it didn't bother me this camp either.  The added cushioning seems to prevent any irritation of the corn.

One odd thing which I may have to work on is, when I pulled off my socks to change them after wearing them two days, my toes were filthy.  Aparently the tenacious dirt went through the cloth upper of the shoe, through a thick wool hiking sock, and through a liner sock to get to my toes.  The rest of the foot was relatively clean.  Fortunately I had some Wet Ones with me and I could clean my toes before putting on clean socks.
Learned:  Toesocks work wonders for reducing the chances of getting blisters.  A must have on long hikes.
I'm sure there were other lessons in there that I've forgotten.  There are always opportunities to learn things when you do something new.  All of these lessons, once I tackle them and find solutions, will help me on the Appalachian Trail (AT).  The only one that really won't matter much is the one hardest to solve and that is altitude.  The highest point on the AT, Clingmans Dome, is only 6,643 ft (2,025 m) which is nearly a thousand feet lower than Estes Park and nearly two thousand feet lower than the Bear Lake trailhead where I started my hike.  I would consider that a good thing for, as I said before, altitude kicks butt.

Several times as I was struggling near the end of the day I found myself asking if I was willing to repeat this week twenty-six times along the AT.  At the time, especially during the first three days of the camp, I might have answered a resounding 'No'.  But I've learned my lessons.  I will find solutions.

Near the end, even when it still was difficult, I would stop, look around, and marvel at what I saw.  I would drink a long draw from the filtered river water - some of the best water I've had the pleasure of drinking - and forget all the dark thoughts I'd had the day before.  It's time to start planning my AT adventure.